
REVIEW · TOURS
Tour to Byzantium
Byzantine Istanbul feels close when you walk it. This tour stitches together city walls, Blachernae landmarks, and famous religious sites so you see more than photos. I especially like how the stops are spaced for context, from the Golden Horn area down to Tekfur Palace and the walls, and that the guide history is in real-world order. One thing to consider: you are moving through several areas in a short window, so if you want lots of slow museum time, this may feel like too much motion for a single day.
The pace is built for understanding. You start with the setting of the empire’s harbor life, then shift into churches, palaces, dungeons, and defensive walls—exactly the mix that explains why Constantinople held power for centuries. I also like that you get a live guide in English or Spanish and skip the ticket line, which helps you spend your time looking, not waiting.
In This Review
- Key points worth knowing before you go
- Constantinople in walking distance: why this loop makes sense
- Golden Horn and Fener: starting with the waterfront world of the Byzantines
- Panagia of Blachernae: the shrine story behind Hagiasma and Hagion Lousma
- St. Savior in Chora (Kariye area): seeing the Chora story from the outside
- Anemas Dungeons: where palace power turns into punishment
- Tekfur Palace: the 12th-century pavilion that still speaks to the walls
- Byzantine city walls: the 5th-century scale you can actually sense
- Price and value: is $85 fair for these Byzantine stops?
- Logistics that can change your day: pickup windows, timing, and how to confirm
- Who this tour suits best (and who might want something else)
- Should you book this Tour to Byzantium?
- FAQ
- How long is the Tour to Byzantium?
- What’s included in the price?
- What is not included?
- Will I visit the Kariye Museum inside?
- What languages is the guide?
- Is hotel pick-up guaranteed?
- What should I bring, and what’s not allowed?
Key points worth knowing before you go
- Golden Horn views: You begin at the Byzantine naval harbor area known for its hornlike shape and golden reflections.
- Panagia of Blachernae focus: You learn how the Hagiasma holy water and Hagion Lousma sacred bath were part of the shrine’s reputation.
- Chora area, but outside only: St. Savior in Chora is visited from the outside, so plan on seeing the site setting rather than extended mosaic time inside.
- Anemas Dungeons structure: You’ll hear about the unique layout—multiple dungeons with basements below sea level.
- Tekfur Palace remains: You get the story of the 12th-century pavilion next to the walls, the only surviving part of the Blachernae Palace pavilion.
- Real scale of the walls: You finish with the remains of 5th-century Byzantine walls and a sense of their length, towers, and gates.
Still deciding? Here is how a few Istanbul favourites compare with this one:


Constantinople in walking distance: why this loop makes sense
This is one of those tours where the itinerary order actually matters. Byzantine Istanbul can feel like a bunch of separate sights if you visit them on your own. Here, you go from the symbolic geography of the Golden Horn to the religious heart of Blachernae, then to the palace-and-prison layers, and finally to the defensive perimeter.
That sequence helps you connect dots quickly. You start where ships and trade mattered. Then you move to where devotion and imperial prestige met. After that, you see the darker side of power—prisons integrated into the palace complex. Ending at the wall remains is a smart payoff: you can look at stone and imagine the scale of a city that lasted over 1,000 years.
It’s also a practical tour length. You’re out for about 4 hours, which is long enough to feel like a real experience but short enough to pair with another afternoon plan in Istanbul.
If you like history that explains real space—where things stood and why they were placed—this format should fit you.
Golden Horn and Fener: starting with the waterfront world of the Byzantines
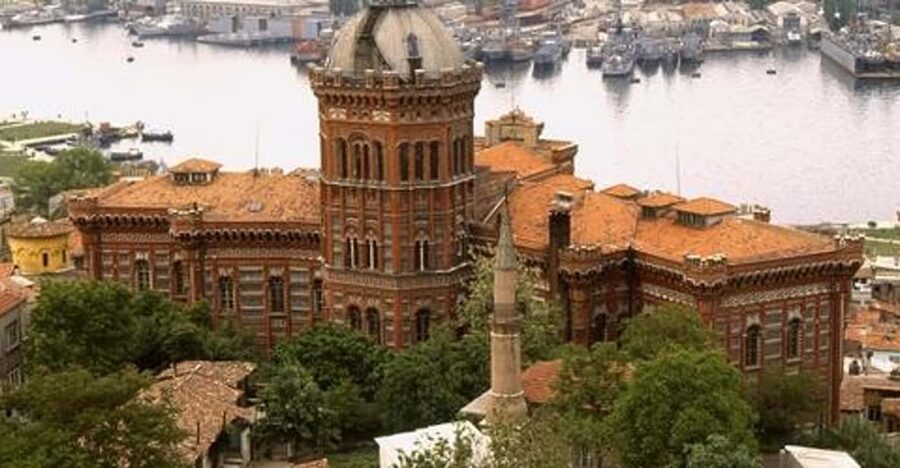
Your tour begins at the Byzantine naval harbor area called the Golden Horn. The name comes from its hornlike shape, and the description about golden reflection under sunshine from hilltops isn’t just poetic—it cues you to notice light, water, and elevation as part of the city’s power.
From there, you head toward the Patriarchate area at Fener. This is where Orthodox Christianity’s seat is tied to Constantine the Great declaring Christianity the official religion of the Roman Empire. You don’t need to memorize dates to get the point. The guide framing helps you see why the church wasn’t a separate world—it was woven into the empire’s identity.
What I like here is the “big picture” setup. Before you hit the churches and palace sites, you understand what kind of capital Constantinople wanted to be: spiritual center, political center, and commercial center all at once.
A potential drawback: if you’re expecting a long stop with panoramic viewpoints and unstructured free time, the early part is more about orientation than lingering.
Panagia of Blachernae: the shrine story behind Hagiasma and Hagion Lousma
Next comes one of the most celebrated Blachernae shrine stops: the Church of Panagia of Blachernae. This is described as the best known shrine of the Holy Virgin and tied to two famous ideas: Hagiasma (holy water) and Hagion Lousma (sacred bath).
Why does that matter to you on the ground? Because it helps you read the church not only as architecture, but as a place where people came for healing and ritual cleansing. If you go in with that context, you’ll notice more than walls and gates—you’ll understand why the site carried weight.
Even if you don’t know every detail of Byzantine devotion, the tour approach makes the shrine feel purposeful. It’s not random sightseeing. It’s a religious landmark that attracted attention because the story around its holy waters and sacred bathing shaped how people experienced the holy in daily life.
Plan for the fact that this is a guided explanation plus walking between areas. You’ll get a strong sense of the site, but you’re not here for a slow spiritual retreat.
- Best of Istanbul 1, 2 or 3-Day Private Guided Istanbul Tour★ 5.0 · 8,922 reviews
- Istanbul: Basilica Cistern Fast-Track Entry and Audio Guide★ 4.6 · 7,521 reviews
- Istanbul: Hagia Sophia Skip-the-Line Ticket & Museum Option★ 3.7 · 4,958 reviews
- Istanbul: Hodjapasha Whirling Dervishes Show & Exhibition★ 4.4 · 4,790 reviews
St. Savior in Chora (Kariye area): seeing the Chora story from the outside
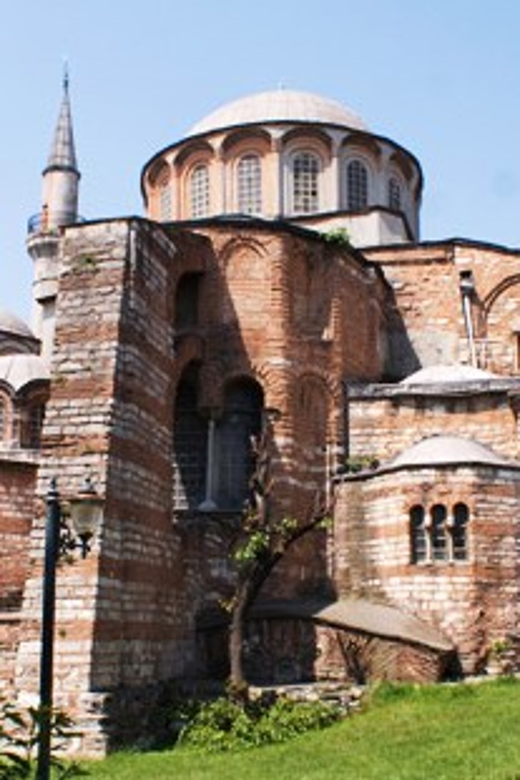
Your tour includes St. Savior in Chora, now known as the Kariye Museum—but there’s an important limitation. You visit from outside only, with no interior visit.
This detail changes how you should think about the stop. You will still get the concept: it was originally a Byzantine monastery with fantastic mosaics and frescoes portraying scenes from the Bible. The emphasis is on the setting and the historical role of the complex, not on standing inside and spending an hour in the galleries.
If mosaics are your main obsession, you might feel shortchanged by the outside-only visit. On the other hand, the advantage is timing. You keep momentum and don’t spend the entire tour inside one building. That can be a win if you want to hit Blachernae, dungeons, Tekfur Palace, and the walls as well.
I also appreciate how this helps first-time visitors. You can still understand why Chora is famous, while the guide continues the bigger narrative across multiple sites.
Anemas Dungeons: where palace power turns into punishment
Then you shift into something rare: Anemas Dungeons. This part of the Blachernae Palace complex is unique in its architectural structure, and the tour frames it clearly: used as a prison for high-ranking statesmen, with 14 separate dungeons, each with two basements below sea-level.
That layout is the kind of detail that makes history feel physical. You start connecting the empire’s grand image to how it managed risk, threats, and control. The dungeon structure implies planning for long-term confinement—this wasn’t a quick lock-up; it was built into the palace’s underworld.
You’ll likely get a guide-led explanation that helps you visualize what you’re seeing and why it’s unusual. Even if you can’t picture every stone in your head, the concept of below sea-level basements gives you an immediate sense of design intent.
The practical side: this stop is still on a walking tour schedule, so don’t plan to treat it like a standalone deep research session.
Tekfur Palace: the 12th-century pavilion that still speaks to the walls
After the dungeons, you go to Tekfur Palace, built in the 12th century and adjacent to the city walls. The key detail is that it’s described as the only surviving pavilion of the Blachernae Palace.
That makes Tekfur Palace valuable in a very specific way. If the rest of the palace complex is gone or heavily altered, what remains becomes a kind of anchor point—one place where you can connect the palace story to the defensive story right next to it.
This is also a good moment to look outward. Since Tekfur Palace sits by the walls, the guide’s talk can help you switch from “palace as luxury” to “palace as part of a fortified zone.” You’re watching the empire’s priorities stack up: religion, administration, security, and power.
If you’re the kind of traveler who likes photos, this is a strong stop because the relationship between building remnants and surrounding walls is visually clear.
Byzantine city walls: the 5th-century scale you can actually sense
The finale is the remains of the 5th-century Byzantine city walls that surrounded the acropolis of Byzantium. The numbers are impressive enough on paper—13 miles (22 kilometers) long, 96 towers, and 9 main gates—but the tour’s value is that you get to see remnants in real space.
Why those stats matter for you: walls like this weren’t just “fortifications.” They were the physical boundary that shaped where people could live, move, trade, and defend. When you stand near surviving segments, the scale stops being abstract.
The tour closes with you having the major layers in your head:
- water power at the Golden Horn
- religious legitimacy at Blachernae
- political control through palace institutions
- defense through massive wall systems
That’s the sort of mental map that makes Istanbul’s Byzantine period feel less confusing.
Price and value: is $85 fair for these Byzantine stops?
The price is listed at $85 per person, and for what’s included, it can be a solid value if you want guided context.
Here’s what you do get:
- Air-conditioned transportation
- Museum entrance fees (where applicable on this route)
- Pick-up service from centrally-located hotels in Istanbul
- A live English or Spanish guide
- Skip the ticket line
What you don’t get: hotel drop-off at the end.
So the value equation is: you pay for guidance plus transportation plus fees that might cost you time and effort if you DIY it. The tour also tries to solve a common problem in Istanbul: seeing too little because you get stuck in transit or lineups.
Is it worth it if you love free roaming? Maybe not. If you prefer long independent pacing and don’t need the guide to connect the sites, a self-guided plan can feel cheaper.
But if you want a guided “explain it in order” experience that covers the walls, Blachernae area, and palace/dungeon story within a single half-day window, $85 feels more reasonable than it first appears.
Logistics that can change your day: pickup windows, timing, and how to confirm
This is where I suggest you plan smart. Pick-up is only offered for centrally located hotels, and the supplier will advise alternative meeting points for hotels that are not accessible. After booking, you need to call the local supplier to learn the exact time and confirm free shuttle availability.
Free shuttle pick-up is offered between 13:00 and 14:00, and it takes about 45 to 60 minutes depending on your hotel location. That means your afternoon plan should allow some buffer. If you’re trying to squeeze in a separate appointment right before pickup, you may feel rushed.
The tour duration is listed as 4 hours, and the description also mentions a 3-hours tour. In practice, expect it to be around that range and build in some flex time for transitions between stops.
One more detail that affects planning: a minimum of 6 people is required to operate, and departures are guaranteed on Tuesday afternoons. If you’re traveling on another day, confirm your schedule when you reserve.
Who this tour suits best (and who might want something else)
This works best for you if:
- you want an organized introduction to Byzantine Istanbul in a short block of time
- you like religious, political, and architectural context (not just photo stops)
- you enjoy hearing specific stories, like the 14 dungeon layout at Anemas Dungeons
- you prefer a guide to connect sites into one narrative
It may not be ideal if:
- you want long interior time, especially at the Kariye Museum area, since the Chora stop is outside only
- you dislike walking with limited downtime during a half-day tour
Also, if you’re traveling with someone who gets impatient when history sounds like lecture after lecture, this format can still work. The sites themselves do a lot of the talking—your guide’s job is to help you see why each place mattered.
And one more helpful tip: if your guide happens to be Umut, you should lean in—his storytelling style has been described as true historian-level, and that matches the kind of tour where a strong guide can make everything click.
Should you book this Tour to Byzantium?
If your goal is a guided, high-context introduction to the Byzantine layers of Istanbul—Golden Horn views, Blachernae’s shrine significance, palace prisons, Tekfur Palace remnants, and the city wall scale—then yes, book it. The $85 price makes more sense because it bundles transportation, entrance fees, and skip-the-line help into a compact route.
Book it especially if you’re on a tight schedule and want one organized afternoon that makes the Byzantine period feel understandable, not scattered. If you mainly want interior art time at the Kariye Museum, you may want a different option that includes inside viewing.
FAQ
How long is the Tour to Byzantium?
The tour duration is listed as 4 hours, and the description also refers to a 3-hours tour. Plan for a short afternoon outing with multiple stops.
What’s included in the price?
Included are air-conditioned transportation, museum entrance fees, pick-up service from centrally-located hotels, and a live tour guide (English and Spanish).
What is not included?
Hotel drop-off is not included.
Will I visit the Kariye Museum inside?
You will stop at St. Savior in Chora, now the Kariye Museum, but the visit is described as from outside only, with no interior visit.
What languages is the guide?
The live tour guide is available in English and Spanish.
Is hotel pick-up guaranteed?
Pick-up is only for centrally-located Istanbul hotels. After booking, you need to call the local supplier to learn the exact time and whether free shuttle pick-up is available for your specific hotel.
What should I bring, and what’s not allowed?
Bring your passport or ID card. Pets and smoking are not allowed.
More Tours in Istanbul
- Best of Istanbul 1, 2 or 3-Day Private Guided Istanbul Tour★ 5.0 · 8,922 reviews
- Istanbul: Bosphorus Sightseeing Cruise Tour with Audio Guide★ 4.6 · 4,704 reviews
- Istanbul: Blue Mosque & Hagia Sophia Guided Tour w/ Tickets★ 4.8 · 3,600 reviews
- Istanbul: Blue Mosque, Hagia Sophia, & Old Town Walking Tour★ 4.8 · 2,372 reviews
- Istanbul: Princes Islands Tour with Heybeliada and Buyukada★ 4.4 · 2,305 reviews
- Istanbul: Basilica, Hagia Sophia, Blue Mosque Tour & Cruise★ 4.5 · 1,929 reviews
More Tour Reviews in Istanbul
- Istanbul: Bosphorus Dinner Cruise & Show with Private Table★ 4.8 · 62,058 reviews
- Istanbul: Daytime or Sunset Sightseeing Cruise & Audio Guide★ 4.8 · 14,430 reviews
- Istanbul: Bosphorus Dinner Cruise & Turkish Night Show★ 4.8 · 12,954 reviews
- Best of Istanbul 1, 2 or 3-Day Private Guided Istanbul Tour★ 5.0 · 8,922 reviews
- Istanbul: Basilica Cistern Fast-Track Entry and Audio Guide★ 4.6 · 7,521 reviews
- Istanbul: Hagia Sophia Skip-the-Line Ticket & Museum Option★ 3.7 · 4,958 reviews
Fresh off the boat: new Istanbul reviews


Tours, compared.
 ★ 5.0Best of Istanbul 1, 2 or 3-Day Private Guided Istanbul TourFrom $1008,922 reviews
 ★ 4.6Bosphorus Sightseeing Cruise Tour with Audio GuideFrom $74,704 reviews
 ★ 4.8Blue Mosque & Hagia Sophia Guided Tour w/ TicketsFrom $393,600 reviews
 ★ 4.8Blue Mosque, Hagia Sophia, & Old Town Walking TourFrom $712,372 reviews
 ★ 4.4Princes Islands Tour with Heybeliada and BuyukadaFrom $182,305 reviews
 ★ 4.5Basilica, Hagia Sophia, Blue Mosque Tour & CruiseFrom $681,929 reviews
 ★ 4.5Blue Mosque Guided TourFrom $191,910 reviews
 ★ 4.1Bursa & Uludag Tour with Lunch & Cable Car OptionFrom $301,879 reviews